
Add Custom Node to DigitalOcean Diagram in AI Line Studio: A Step-by-Step Guide
AI Line Studio's custom node feature lets you add personalized elements to any DigitalOcean architecture diagram. After generating a multi-VPC hub-and-spoke diagram from a text prompt, you can click Add Node in the header menu, label your custom element, and drag it onto the canvas. You then connect it to existing nodes with a simple click-and-drag action. The feature makes your diagrams more flexible and tailored to specific use cases.
YouTube Tutorial
AI Line Studio Tutorial 48: Add Custom Node to DigitalOcean Diagram
Setting Up Your DigitalOcean Hub-and-Spoke Diagram
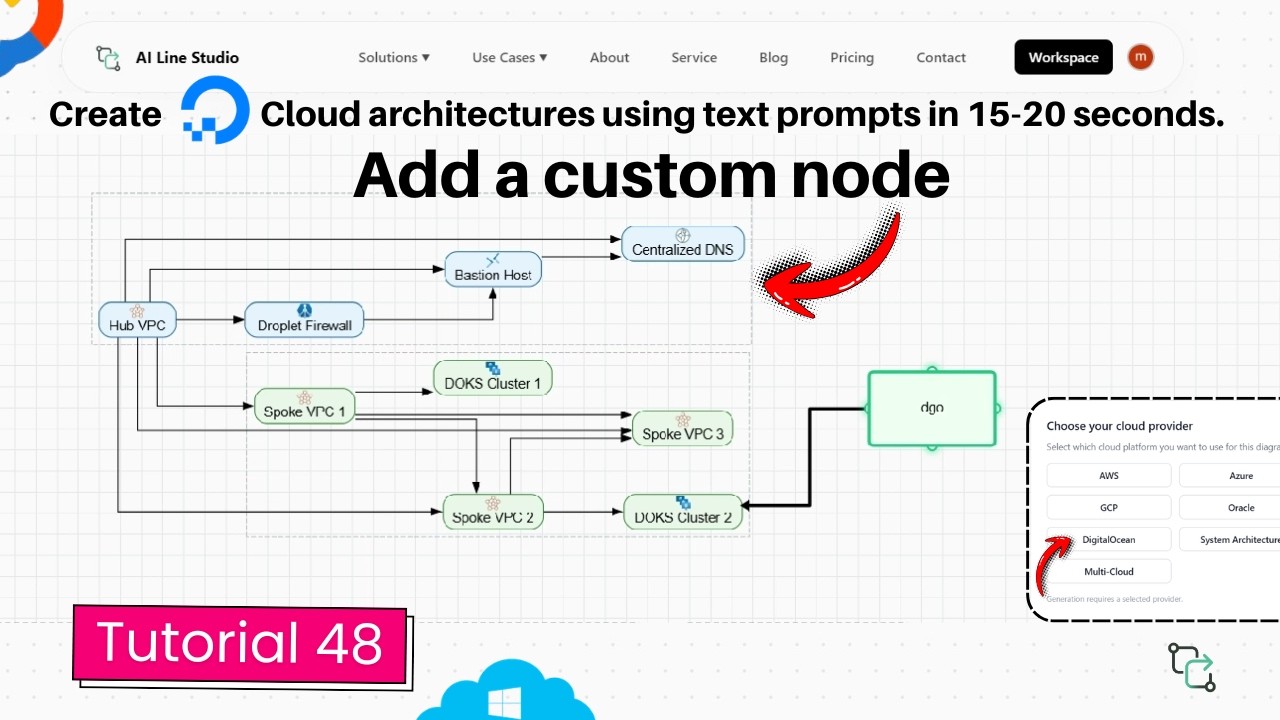
After registering on AI Line Studio, you land on the Workspace page. Select Cloud Architecture to open the provider selection, and choose DigitalOcean as your cloud provider. The video demonstrates this with a multi-VPC hub-and-spoke architecture in DigitalOcean, which the platform generates automatically in roughly 15 to 20 seconds.
The generated diagram includes the core components of a hub-and-spoke network: a central hub VPC, connected spoke VPCs, and the networking links between them. At this stage, the diagram is built entirely from standard components. Every node represents a service or resource that the platform recognized from your prompt.
If you want cleaner initial outputs, the input guide covers how to write prompts that produce accurate DigitalOcean topologies.
How to Add Custom Node to DigitalOcean Diagram in AI Line Studio
Once your diagram is ready, locate the header menu and click on the Add Node button. A text box prompts you to enter a label. In the video, the presenter enters "DGO" as the label and clicks OK. After entering the label, you drag and draw the node onto the canvas, placing it anywhere you prefer.
To link the new custom node to an existing node in your diagram, click on the custom node, which highlights it in green. Then click and drag the connection line to link it to the desired existing node. The connection forms immediately, integrating your custom element into the existing architecture.
This means you can add custom node to DigitalOcean diagram in AI Line Studio to represent anything the standard library doesn't cover. Whether it's a proprietary internal service, a third-party integration, or a legacy system, the custom node gives you a way to include it without forcing it into an existing shape category.
Why Custom Nodes Matter for DigitalOcean Diagrams
Standard diagram libraries cover common services well, but they don't account for every component in a real-world architecture. Your infrastructure likely includes internal APIs, custom middleware, or partner services that don't map cleanly to DigitalOcean's standard resource types. The custom node feature solves this by letting you represent those elements explicitly in your cloud architecture diagram.
System architects can use this during design reviews to show non-standard components alongside standard ones. When you're documenting a multi-VPC setup that includes a proprietary load balancer or an internal monitoring tool, the custom node lets you place it accurately in the topology rather than omitting it or mislabeling a standard shape. That accuracy matters when you're presenting to stakeholders who need to understand the full system, not just the parts that fit neatly into a template library.
Software engineers benefit when documenting systems that span multiple providers or include custom-built services. The ability to label a node exactly what it is, rather than forcing it into a generic "server" or "database" icon, makes the diagram more honest and more useful for onboarding. A new engineer looking at the diagram can see "DGO" or "Internal API Gateway" and know exactly what that component does, rather than guessing based on a generic shape.
DevOps teams also find value here. When you're mapping out a deployment pipeline that includes custom build agents or internal artifact repositories, those components deserve representation in the architecture. The custom node lets you include them without breaking the visual consistency of the diagram.
Comparing Custom Nodes to Static Diagram Tools
Most diagramming platforms offer some form of custom shape, but the workflow is often cumbersome. You import an image, resize it, align it manually, and then draw connection lines that don't snap properly. If you're comparing approaches, Draw.io supports custom shapes through image imports, but the process requires multiple steps and manual alignment for every instance.
AI Line Studio keeps the custom node workflow inside the diagram editor. You click Add Node, type a label, drag it onto the canvas, and connect it with native click-and-drag behavior. The connection lines snap correctly, the node scales with the rest of the diagram, and the label stays readable. The custom element isn't an imported image layered on top, it's a native part of the diagram structure.
For teams that produce architecture documentation regularly, this removes the friction of maintaining a separate shape library or re-importing the same custom icons for every new diagram. You don't need to keep a folder of PNG assets or worry about resolution mismatches when scaling. The label-based approach means your custom nodes are always crisp and readable, regardless of export size.
Getting Started With Your First Custom Node
The workflow is consistent regardless of architecture complexity. Generate your DigitalOcean diagram from a text prompt, click Add Node in the header menu, enter your label, drag the node onto the canvas, and connect it to existing components. The entire process from prompt to customized diagram takes under a minute.
If you're building diagrams for production documentation or client presentations, you can review the pricing plans to see which tier includes custom node features and export options.
Key Takeaways
- Add custom node to DigitalOcean diagram in AI Line Studio using the Add Node button, a custom label, and click-and-drag connection.
- The custom node feature supports any label you choose, making it ideal for proprietary services and third-party integrations.
- Nodes highlight in green when selected and connect to existing components with native snapping behavior.
- The workflow from text prompt to customized diagram takes under a minute.
Ready to add custom nodes to your DigitalOcean diagrams?
Try the feature on AI Line Studio's free plan and personalize your architecture visuals in seconds.
Try It FreeFrequently Asked Questions
It is a diagramming tool that lets you add personalized nodes to any cloud architecture diagram. You click Add Node in the header menu, enter a label, drag the node onto the canvas, and connect it to existing nodes.